Top 3 Method to Upgrade Windows 10 to 11

Upgrade Windows 10 to 11: Windows 10 has been a popular operating system since Windows 7, but Microsoft introduced Windows 11 on September 15, 2021. Since its release, Windows 11 has gained popularity due to its advanced design, features, and improved performance. Has gained priority over Windows 10. Also gaining popularity among users.
As a result, Windows 10 is slowly moving towards obsolescence. If you want to enhance your computing experience by transitioning from Windows 10 to 11, this guide provides comprehensive ways to upgrade. Let’s look at different ways to make it possible to upgrade and improve your system.
Let us first look at the features of Windows 11 so that we can get more information about Win 11. So let’s start to upgrade from Windows 10 to 11.
Amazing Features of Windows 11
- Redesigned Start Menu and Taskbar: Windows 11 features a centered Start menu and taskbar for a cleaner, more modern look.
- Snap Layout Improves Multitasking: Snap Layout enables fast grouping of multiple windows for efficient multitasking.
- Microsoft Store Redesign with Android App Support: The new store now includes support for Android apps from the Amazon Appstore.
- Better Gaming Experience: Features like Auto HDR and DirectStorage enhance gaming images while also reducing load times, resulting in a more immersive gaming experience.
- Productivity and Microsoft Teams Integration Focus: Adding Teams to the taskbar, plus productivity innovations like virtual desktops and widgets, streamline communications and workflow for increased productivity.
Before we dive into the process, let’s make sure that your device meets the system requirements for Win 11 to upgrade Windows 10 to 11.
System Requirements for Windows 11
Microsoft has set certain system hardware requirements, including a compatible processor, sufficient RAM, a TPM (Trusted Platform Module), secure boot, and DirectX 12 compatibility. You can use the PC Health Checkup tool to assess the health of your system.
Remember Point: Following the process below, you will move from Win 10 to Win 11. So, all your data and files are going to be transferred to the new computer. But, before this, we advise you to prepare a backup of all your imported data. So that you have a safe copy of the data
After knowing the features of Windows 11 and the system requirements for the upgrading process. Let us now know the steps of updating from Windows OS 10 to Windows OS 11 in a step-by-step manner.
Best 3 Techniques to Upgrade Windows 10 to 11
There are three types of provisions for moving from Windows 10 to Windows 11. With the help of this, this process becomes quite easy. So, these methods are different from each other. Now, let us move ahead and follow all the existing methods to update Windows 10 to Windows 11. But, before this, definitely pay attention to the system requirements mentioned above to see whether your system matches all the requirements of Windows 11 or not. Well, let us move ahead and follow all the existing steps.
Method 1: Using the Windows Update Option
In this first process, we will move Windows 10 to 11 using the Windows Update option. So, let us follow the below-mentioned steps:
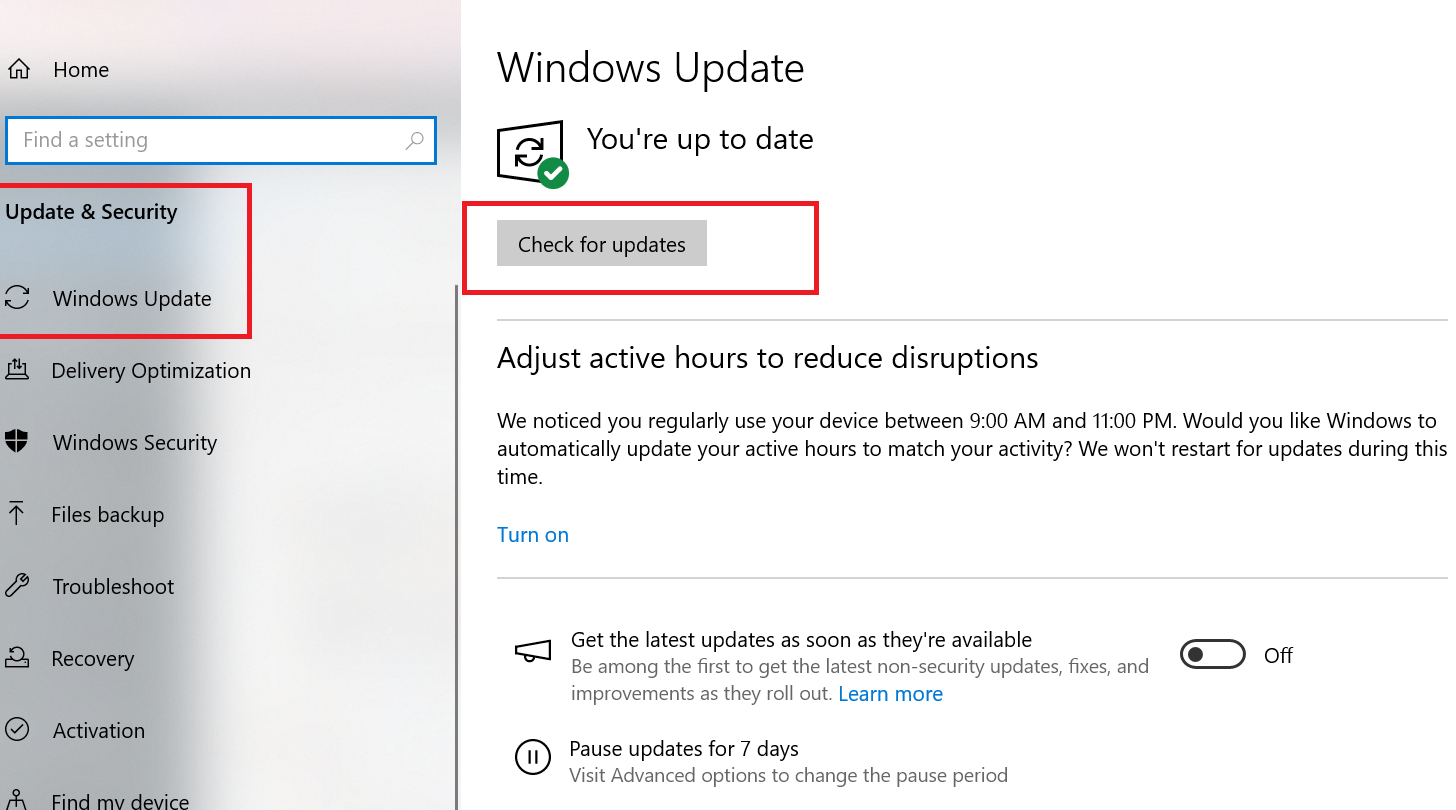
- Go to “Start” >> “Settings” >> “Update & Security” >> “Windows Update”.
- After that, select “Check for Updates” to see if Windows 11 is ready for your device.
- If the upgrade is available for your device and you wish to proceed, you must first download and install it.

Note: Downloading and installing Windows 11 will most likely take longer than a usual Windows 10 feature update. You can use your computer while it downloads, and you can schedule the installation for a time when you won’t be using it.
Let’s move on to the second method below. With the help of this, we will be able to upgrade from Windows 10 to 11. So let’s start knowing the steps to upgrade Windows 10 to 11.
More Read: Update Your Samsung Smart TV
Method 2: Upgrade Using Bootable USB
In the second solution of this upgrade method, we will accomplish this using a bootable USB. Which has two parts which are described below in more steps.
Step 1: Create Bootable USB Drive
If you have a CD/DVD then you can burn the ISO file using it. Apart from this, if you have a USB drive then a drive can be created to boot it, the steps of which are mentioned below:
- First, download “RUFUS” from the official website.
- Then, start this application on your Windows 10 PC. Then, pick the USB device you’ve attached to the machine, followed by a Partition scheme, a Target system, and more.
- Finally, hit the “Start” button to begin generating a bootable USB flash drive.

Step 2: Install Win 11 From Bootable USB Drive
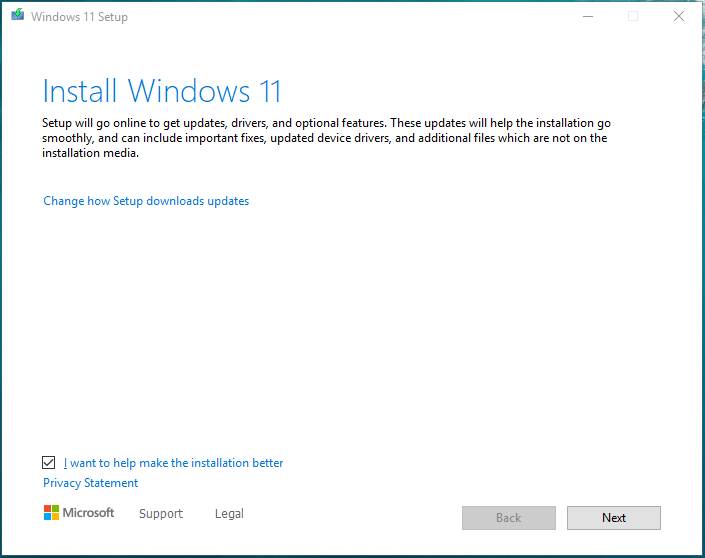
You can update Windows 10 to 11 on your system using a USB drive created for your computer. Simply restart Windows 10, click a particular key to access BIOS, alter the boot sequence, and reboot to the Windows setup screen. Now, start the Windows 11 installation.
- Select your language, time format, and typing type for Windows 11. Click Next to proceed.
- After that, click Install Now to proceed to upgrade Windows 10 to 11.
- After a moment, click “I don’t have a product key.”
- Accept the license conditions and then click Next to proceed.
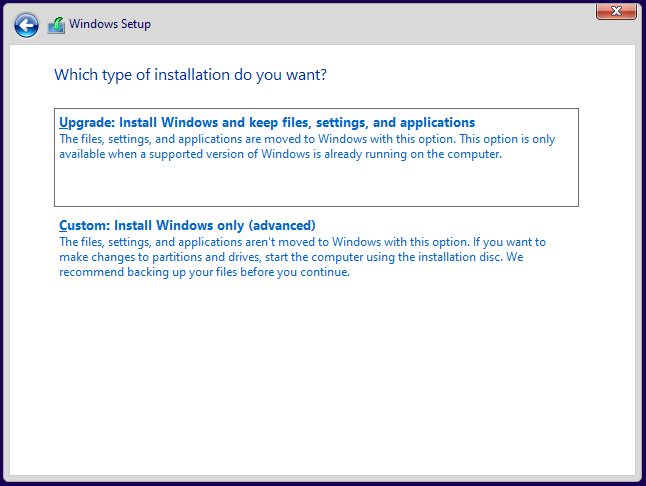
- There are two installation options available to you. To upgrade from Windows 10 to Windows 11, select the first option: install Windows and maintain files, settings, and programs. To make a clean installation, select Custom: Install Windows Just (advanced) to upgrade from Windows 10 to 11.

- Complete the Windows 10 update/installation by following the on-screen prompts.
If even with the above-mentioned method you are not able to switch Win 10 to Win 11. So, follow the method given below.
Method 3: Upgrade Windows 10 to 11 Without TPM
We have explained the system requirements and method of updating above. But, if your computer does not meet those important requirements then you can update Windows OS even without TPM. To do this just follow the methods given below:
- If you see an error message like “This PC can’t run Windows 11” during the update process using a Bootable USB drive. So, simply, with the help of the keyboard, press “Shift + F10” simultaneously. This will launch the “Command Prompt” for the Windows Setup interface.
- After that, Enter regedit and click OK to launch Windows Registry Editor.
- Then, navigate to HKEY_LOCAL_MACHINE\SYSTEM\Setup, right-click the Setup folder, and then select New >> Key. Name it LabConfig.
- Then, Right-click LabConfig, and select New > DWORD (32-bit) Value. Name the key BypassTPMCheck and double-click it to change the value of data to 1 to update Windows 10 to 11.

- After that, create a new DWORD key called BypassSecureBootCheck and set its value data to 1.
- Finally, exit the Registry Editor and Command Prompt. Then you can finish the Windows 11 installation as usual.
Tip: If you execute the setup.exe directly to upgrade Windows 10 to Windows 11, you can install Windows 11 without the TPM by replacing the appraiserres.dll file in Windows 11 Setup. Simply look for specific steps on the Internet.
Bringing It All Together
From all the parts mentioned in this technical guide, you must have understood why people want to move to Windows 11 today. So, to upgrade Windows 10 to 11, we have described three types of different methods in this guide, through which you will be able to upgrade from Windows 10 to 11 easily.